创建一个 Window-based Application程序,在其中添加一个Hypnosister的类,这个类选择继承UIObject。修改这个类,使他继承:UIView
@interface HypnosisView : UIView
自定义View的关键是定义drawRect: 方法,因为主要是通过重载这个方法,来改变view的外观。例如,可以使用下面代码绘制一个很多环中环的效果的view。

 View Code - (void)drawRect:(CGRect)rect { // What rectangle am I filling? CGRect bounds = [self bounds]; // Where is its center? CGPoint center; center.x = bounds.origin.x + bounds.size.width / 2.0; center.y = bounds.origin.y + bounds.size.height / 2.0; // From the center how far out to a corner? float maxRadius = hypot(bounds.size.width, bounds.size.height) / 2.0; // Get the context being drawn upon CGContextRef context = UIGraphicsGetCurrentContext(); // All lines will be drawn 10 points wide CGContextSetLineWidth(context, 10); // Set the stroke color to light gray [[UIColor lightGrayColor] setStroke]; // Draw concentric circles from the outside in for (float currentRadius = maxRadius; currentRadius > 0; currentRadius -= 20) { CGContextAddArc(context, center.x, center.y, currentRadius, 0.0, M_PI * 2.0, YES); CGContextStrokePath(context); }
}
View Code - (void)drawRect:(CGRect)rect { // What rectangle am I filling? CGRect bounds = [self bounds]; // Where is its center? CGPoint center; center.x = bounds.origin.x + bounds.size.width / 2.0; center.y = bounds.origin.y + bounds.size.height / 2.0; // From the center how far out to a corner? float maxRadius = hypot(bounds.size.width, bounds.size.height) / 2.0; // Get the context being drawn upon CGContextRef context = UIGraphicsGetCurrentContext(); // All lines will be drawn 10 points wide CGContextSetLineWidth(context, 10); // Set the stroke color to light gray [[UIColor lightGrayColor] setStroke]; // Draw concentric circles from the outside in for (float currentRadius = maxRadius; currentRadius > 0; currentRadius -= 20) { CGContextAddArc(context, center.x, center.y, currentRadius, 0.0, M_PI * 2.0, YES); CGContextStrokePath(context); }
}这样view的效果如下图:

我们可以继续绘制一些东西,比如绘制文字,将下面代码添加带这个方法后面。
// Create a string NSString *text = @"我是朱祁林,不是朱麒麟"; // Get a font to draw it in UIFont *font = [UIFont boldSystemFontOfSize:28]; // Where am I going to draw it? CGRect textRect; textRect.size = [text sizeWithFont:font]; textRect.origin.x = center.x - textRect.size.width / 2.0; textRect.origin.y = center.y - textRect.size.height / 2.0; // Set the fill color of the current context to black [[UIColor blackColor] setFill]; // Set the shadow to be offset 4 points right, 3 points down, // dark gray and with a blur radius of 2 points CGSize offset = CGSizeMake(4, 3); CGColorRef color = [[UIColor darkGrayColor] CGColor]; CGContextSetShadowWithColor(context, offset, 2.0, color); // Draw the string [text drawInRect:textRect withFont:font];
效果:

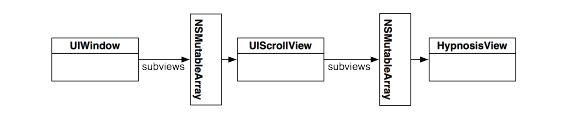
如果view过大,我们可以把它放置到一个UIScrollView中间,这样就可以进行拖动了。UIScrollView与View的关系如下图:
使用下面代码创建一个比iPhone屏幕大4倍的View,然后通过UIScrollView来展示,代码如下:
- (BOOL)application:(UIApplication *)application didFinishLaunchingWithOptions:(NSDictionary *)launchOptions { //创建一个窗体大小的CGRect CGRect wholeWindow = [[self window] bounds]; // 创建一个窗体大小的HypnosisView实例 view = [[HypnosisView alloc] initWithFrame:wholeWindow]; UIScrollView *scrollView = [[UIScrollView alloc] initWithFrame:wholeWindow]; [[self window] addSubview:scrollView]; // Make your view twice as large as the window CGRect reallyBigRect; reallyBigRect.origin = CGPointZero; reallyBigRect.size.width = wholeWindow.size.width * 2.0; reallyBigRect.size.height = wholeWindow.size.height * 2.0; [scrollView setContentSize:reallyBigRect.size]; CGPoint offset; offset.x = wholeWindow.size.width * 0.5; offset.y = wholeWindow.size.height * 0.5; [scrollView setContentOffset:offset]; // Create the view view = [[HypnosisView alloc] initWithFrame:reallyBigRect]; [view setBackgroundColor:[UIColor clearColor]]; [scrollView addSubview:view]; [scrollView release]; [[UIApplication sharedApplication] setStatusBarHidden:YES withAnimation:UIStatusBarAnimationFade]; [[self window] makeKeyAndVisible]; return YES; }
这样我们就可以拖动来展示看不到的view了,如下图:

通过UIScrollView我们还可以设置view的缩放功能,将下面代码添加到中。这样我们就可以使用两根手指缩放view了。
// Enable zooming [scrollView setMinimumZoomScale:0.5]; [scrollView setMaximumZoomScale:5]; [scrollView setDelegate:self];
总结:文本简单的总结了一下自定义view的使用。
代码:Hypnosister.zip

最新评论